Showing posts with label Casseroles. Show all posts

Friday, December 2, 2016

Sour Cream Noodle Bake

Pioneer Woman's Sour Cream Noodle Bake

A couple of months ago I started stocking my freezer with things I could pull out for easy meals. When you’re following a low sodium diet, finding quick meals can be a challenge. Grabbing something from the grocery deli is out. Same with picking up a pizza. What’s the answer? Having a well stocked freezer and pantry.

I’ve always frozen dishes that made a lot of servings  ‒ like soups, stews, pulled pork, etc. And I’d freeze leftovers from 9 x 13 casseroles. But all the casserole freezing was after-the-fact. It only happened when I realized we weren’t eating something fast enough, and I didn’t want it to go bad.

This time around, I wanted to try out some casserole recipes specifically for freezing. So I went searching online and discovered Pioneer Woman’s Sour Cream Noodle Bake. It immediately caught my interest because it uses cottage cheese, and I often have a tub of NSA cottage cheese in my fridge. Same with sour cream. So I gave the recipe a whirl and modified it for low sodium. Instead of using a 9 x 13 pan, I made two 8 x 8 casseroles. One for immediate consumption and one for freezing.

Freshly Baked 8 x 8 Pan
I used disposable foil casserole pans, following the general directions for assembling the casserole, but dividing everything to accommodate two pans. We got 4 servings from each 8 x 8 casserole. Last week (2 months later) we finally got around to eating the frozen casserole, and it was just as tasty as the freshly made one. So this recipe was a winner. The only changes I made were to use all low sodium/NSA products, add some extra seasoning, and save the grated cheese for the top. Also, I used 1 cup grated cheese for each casserole.


Sour Cream Noodle Bake

1¼ lbs ground beef, chicken, turkey, or pork
One 15-oz can NSA tomato sauce (or two 8-oz cans)
Freshly ground black pepper
1 tbsp low sodium Worcestershire sauce
1 tsp dried savory (or favorite dried herb/NSA herb blend)
1 - 2 cloves minced garlic
8 oz egg noodles (I used bow ties)
½ cup sour cream
1¼ cups NSA cottage cheese
Pinch red pepper flakes (optional)
½ cup sliced green onions (or less to taste)
1 cup grated sharp Cheddar (I used ½ cup cheddar and ½ cup Swiss; I also sprinkled 1 cup cheese on each 8 x 8 casserole)

Preheat the oven to 350 degrees F.

Brown the ground meat in a large skillet. Drain the fat, and then add the NSA tomato sauce, black pepper, low sodium Worcestershire sauce, dried savory, and minced garlic. Stir, and then simmer while you prepare the other ingredients.

Cook the egg noodles until al dente. Drain and set aside.

In a medium bowl, combine the sour cream and NSA cottage cheese. Add a pinch of red pepper flakes, if desired. Add the sour cream mixture and green onions to the noodles and stir.

To assemble, add half of the noodles to a baking dish. Top with half the meat mixture, and then sprinkle on half the grated cheese (I saved all the cheese for the topping). Repeat with noodles, meat and then a final layer of cheese. Bake until all the cheese is melted, about 20 minutes. (I sprinkled all the grated cheese on top.) Do not over-bake.

To freeze: Assemble the Sour Cream Noodle Bake in a disposable aluminum oven-proof pan and seal the top of the container with the lid or heavy foil. Seal the edges to prevent freezer burn and place in the freezer. (I also covered the casserole with a couple layers of plastic wrap.)

To cook from frozen: Place directly in a 375-degree F oven and bake, covered, for 35 - 45 minutes. Remove the lid and bake until cheese has melted and casserole is heated through, about 10 - 15 minutes more.

Note: Because I was using foil pans, I baked the casseroles on cookie sheets to provide stability.


Monday, June 6, 2016

Tamale Pie - Classic American Style

American Style Tamale Pie

I love tamales. I love the meaty chili filling surrounded by masa. It’s one of my favorite things to order at a Mexican restaurant. I even like this casserole that uses a masa crust and tastes close to the real thing. Yet, in spite of all this, I also like the old-fashioned American style Tamale Pie casserole. No attempt at trying to make it taste authentic. It’s a cornbread-like crust that tops a ground beef filling with tomatoes, bell peppers, corn, and just a hint of chili seasoning.

It had been a long time since I made Americanized tamale pie and the craving hit me recently. I started to look up recipes online but then remembered that I’d always used one from my very old Betty Crocker Cookbook. I found the recipe for “Fiesta Tamale Pie” and happily realized I had most of the ingredients on hand. It was easy to put together, easy to alter to low sodium, and the end result was quite tasty. I topped each serving with a combination of store-bought NSA pico de gallo along with some chopped avocado and extra cilantro. It was so enjoyable that I wondered why I hadn’t made it in a while. Now that I’ve rediscovered this classic and homey casserole, I know I’ll be making it more often. It’s a perfect one dish meal!


It also lends itself to lots of variations depending on what you’ve got available and what appeals to you. You could use ground turkey, chicken, or even pork instead of beef. You could substitute NSA/low sodium whole beans, especially pinto or black beans, for half or all the meat. Or you could do the same with the corn, using well rinsed hominy. Instead of regular NSA diced tomatoes, you good use unsalted Rotel for added spice. Or perhaps use some chopped jalapenos, Anaheims, or poblanos instead of all bell peppers. You could even substitute masa for half of the cornmeal in the crust.

Hot from the Oven!

Here’s my adaptation of the original Betty Crocker recipe:

Classic American Tamale Pie
Adapted from Betty Crocker’s New Picture Cookbook – 1961
(Printable Recipe)


I small onion, finely chopped
⅓ cup chopped green bell pepper (optional)
1-2 cloves garlic, minced
1 lb. ground beef
1 14 oz. can NSA diced tomatoes
2 cups NSA frozen corn (I used 1 cup corn and 1 cup rinsed hominy)
1½ tsp. NSA chili powder
½ tsp. ground cumin
10 pitted ripe olives (I used Lindsay low sodium olives – 40 mg sodium/5 olives)
1 cup cornmeal
1 cup milk
2 eggs, well beaten
½ cup grated cheddar cheese (optional)

Heat oven to 350. Saute onion, bell pepper (if using), garlic, and ground beef together until meat is cooked through and vegetables have softened. Drain excess fat. Add tomatoes (with juice), corn, and seasonings. Simmer for about 5 minutes. Pour mixture into square 9 x 9 inch casserole dish. Press olives into mixture. Combine cornmeal, milk, and eggs. Spoon over filling. If desired, sprinkle top with cheese. Bake approximately one hour until cornbread topping is fully cooked. Let rest for about 5 minutes before serving.


Monday, March 25, 2013

Cottage Pie


Such a simple dish – very much comfort food. Made with ground beef, it’s “cottage” pie; made with ground lamb, it’s “shepherd’s” pie. But you could use ground chicken or turkey too.It’s a hearty “pie” filling of ground meat, tasty gravy, and vegetables topped with a layer of fluffy mashed potatoes. And a delicious low sodium version is super easy to make.

You can vary the vegetables according to what you prefer or what you have on hand. If you like a chunkier texture, don’t slice the vegetables too thinly.  I used 2 lbs. of potatoes just because I love mashed potatoes. But I’m sure 1 lb. would suffice. I reconstituted some instant non-fat dry milk for the potatoes and added a sprinkle of freeze dried chives. You can flavor the filling and potatoes with your favorite herbs and omit the cheese topping altogether. If you forgo using the cheese, you might consider dotting the potatoes with bits of butter or sprinkling the top lightly with a buttery herb flavored bread crumb mixture. I used Herb-Ox salt free beef bouillon granules mixed with a cup of water for the broth, and I made a tomato paste substitute by combining Harmony House Tomato Powder and water. All in all, cottage pie is a very adaptable dish.

Here’s the basic outline of what I made last night for dinner:

Cottage Pie
(Printable Recipe)

1-2 lbs baking potatoes, sliced
1/2 - 1 cup warm milk
Fresh/dried herbs (optional)
1/3 - 1/2 cup grated sharp cheddar cheese
1 tbsp. oil
1 lb. ground beef
1/2 a large onion, chopped
1-2 cloves garlic, finely minced or crushed
3 medium carrots, sliced into coins (cut coins in half if large)
3 celery stalks, sliced
1-3 tsp. low sodium Worcestershire sauce
1/4 tsp. thyme
2 tbsp. flour
1-2 Tbsp. salt free tomato paste
1 cup salt free beef broth
1 cup frozen peas

Preheat oven to 450. Place potatoes in a large saucepan; cover with 1 inch of water. Bring to a boil; reduce heat to a simmer. Cook until potatoes are easily pierced with a fork, about 15-20 minutes.

Heat oil in a heavy pot. Add carrots, celery, and onion. Saute until vegetable are tender, about 8-10 minutes. Add flour and tomato paste; cook, stirring 1 minute. Add ground beef and thyme; cook, stirring until no longer pink, about 6-8 minutes. Add the broth, bring to a boil, and simmer about 2-3 minutes. Add frozen peas, stir, and turn off heat. Set beef filling aside.

Drain potatoes and return to pan. (Save the potato water to thin beef gravy if needed.) Cook over low heat, stirring, until all liquid has evaporated, about 1 minute. Remove pan from heat; add warm milk and desired herbs. Mash until smooth; season with pepper.

Pour beef filling into an 8 x 8 inch greased baking pan. Drop dollops of potato over filling and spread to edges. If desired, use a fork to make decorative peaks. Sprinkle with cheese. Bake until topping is browned and filling is bubbling, about 20 minutes. Let stand 5 minutes before serving.


Thursday, September 17, 2009

Tale of Three Vegetables - Eggplant, Squash, & Cabbage


A couple of days ago I went into cooking marathon mode. I made some cracked wheat bread, pizza dough, and three vegetable dishes: Eggplant Bake, Summer Squash Casserole, and Braised Sweet & Sour Red Cabbage. The eggplant and squash were purchased from my local farmers market and the red cabbage came from the local grocery store. I made the tomato sauce for the eggplant and pizza from my home-grown tomatoes & basil.

Quick Homemade Fresh Tomato Sauce
I washed, halved, and seeded a pile of tomatoes and set them to cooking over a medium-high heat. I didn’t bother peeling them. As they cooked, they released a lot of liquid, so I took the pot cover off to let the tomatoes cook down. Eventually they began to thicken, and, at that time, I added some extra virgin olive oil, about three large handfuls of coarsely chopped fresh basil, and four minced garlic cloves. I also tossed in a sprinkle of red pepper flakes. I used tongs to remove some of the skins. Once the mixture had cooked down and reduced, I used my hand held blender to break up any tomato clumps and puree the remaining skins. The resulting salt-free sauce is perfect for pasta, pizza, and eggplant.

Eggplant Bake
The eggplants I picked were small and firm, so I just peeled them and grilled them on my George Foreman grill. Then I layered the grilled eggplant slices with my tomato sauce and some chopped fresh mozzarella cheese. Fresh mozzarella is much lower in sodium than the regular stuff. I usually buy Bel Gioioso brand; it has only 85 mg. sodium per 1 oz. serving. I ended up with two layers of eggplant and one layer of cheese. Then I topped everything off with some homemade breadcrumbs tossed with olive oil, minced garlic, and a tablespoon of Parmesan cheese.

Squash Casserole
I wanted to try a low sodium version of a squash casserole I’d seen on many web sites. It contains squash, cream of mushroom soup, cheese, and stuffing mix. I had noticed last week that my local grocery store was now carrying the truly low sodium version of Campbell’s Cream of Mushroom Soup. In the past, if I wanted to use canned cream of mushroom soup, I’d pick Campbell’s Healthy Request with 470 mg. per ½ cup serving. But the ready-to-serve Low Sodium Cream of Mushroom Soup has only 45 mg. for the entire 10.5 oz. can. Before I’d only been able to get it online. Be forewarned, though. Without all the excess salt, the soup is pretty bland. So I livened things up a bit by adding a squirt of Worcestershire sauce.

Most of the squash casserole recipes I looked at called for boiling the squash and onions together until the vegetables were tender. Then draining, mashing, and finally combining with the soup. I decided to just saute the cubed squash with onions in some unsalted butter. I added some sliced mushrooms I had on hand too. Once the vegetables were almost tender, I added the soup and let everything cook over a medium-low heat until the vegetables were completely cooked (but not mushy). I plopped the squash mixture into a casserole dish and topped it with three ounces of shredded cheese – a mixture of extra sharp cheddar and naturally low sodium Swiss. Instead of stuffing mix, I combined some homemade breadcrumbs with melted butter and hefty pinches of thyme and savory and sprinkled the mixture over the casserole.

Sweet & Sour Braised Cabbage
Finally, I followed the red cabbage recipe I wrote about earlier. It was the perfect accompaniment to the other creamy and cheesy vegetable dishes. I baked the two casseroles while the cabbage was simmering on the stove top. The great thing about this vegetable trio is that it made a tasty vegetarian dinner and the leftovers have been great for quick, no-fuss lunches.

Thursday, January 15, 2009

Cottage Cheese Fun: Stuffed Shells, Dill Rolls, & Chile Egg Puff

How do you end up with six pints of cottage cheese in your fridge? Believe me, it isn’t easy. Here’s the story: I like cottage cheese as a snack, and think of it mainly as a savory food. I like it topped with chopped chives/scallions, a spoonful of salsa, a dash of any one of the numerous spice blends I keep on hand, or a sprinkle of freshly ground pepper. But I don’t care for the cottage cheese and fruit combination – that simply does nothing for me.

A few weeks ago I thought that a nice scoop of cottage cheese sprinkled with a spice blend and served with unsalted pretzels would be a perfect mid-afternoon snack for both me and my husband. So I wrote “cottage cheese” on the kitchen whiteboard where I keep my grocery list. I knew what those simple words meant: Go to Safeway; pick up a pint container of Lucerne No Salt Added 1% Milk Fat Cottage Cheese; pick up another pint container of regular salted cottage cheese; go home and combine the contents of both cartons and repack them.

I find the unsalted cottage cheese unpalatable by itself; it's OK for cooking but not for snacking. But regular cottage cheese is too salty. The solution, for me, is to blend equal parts of both kinds, creating a lower sodium yet tasty product.

But life interfered with my great plans. I wasn’t feeling well for a few days, and my husband did the grocery shopping. He copied the list and went out. Poor guy! He didn’t know all the intricacies involved in buying cottage cheese, so he came home with a quart of the regular stuff. Once I explained the situation, he went out again, this time to Safeway, and came back with four pints of the Lucerne unsalted product. So we ended up with 6 pints of cottage all at once! We combined the salted quart with two of the unsalted pints. And then it was time to start using up all that cottage cheese.

I got some inspiration from the dear folks at the Recipe Exchange forum and decided to make stuffed pasta shells. A few days later, I was feeling well enough to go out grocery shopping for a bit. I picked up some jumbo pasta shells, some fresh baby spinach (in a bag), and a jar of Classico Roasted Garlic pasta sauce. It has the lowest sodium content of all the many prepared pasta sauces sold at my local grocery stores, just 220 mg. sodium per ½ cup.

I really didn’t follow a recipe. I browned some ground pork I had in the freezer and combined it with the Classico sauce; I added an 8 oz. can of unsalted tomato sauce to lower the sodium content even more. I combined one pint of the unsalted cottage cheese with 2-3 cloves of crushed garlic, about 3 tbsp. of chopped basil (frozen during the summer), about ½ the spinach (chopped), one beaten egg, about 3 tbsp. of shredded Parmesan cheese, and a couple of tablespoons of finely ground homemade bread crumbs. I stuffed about 18 shells that had been cooked in unsalted water, lined them up in a Pyrex casserole, and poured the sauce over them. I sprinkled some sliced fresh mushrooms on top, covered them with foil and baked everything at about 375 degrees until the filling was set and hot.

My husband loved the shells, and we ate them all up over the course of two days. A couple of days later, I made them again but with Trader Giotto’s (Trader Joe’s) Organic Marinara Sauce (no salt added & low fat). This second version was meatless. Again, a hit. Two pints of cottage cheese gone.

Recipe Exchange members also suggested making cottage cheese & dill bread or rolls. Since I’m still getting used to my new bread machine, I decided to use a recipe designed specifically for one, Beth Hensperger’s “Cottage Cheese Dill Bread” from The Bread Lover’s Bread Machine Cookbook. However, instead of making a loaf, I made sandwich rolls. And I used dill seed rather than dill weed. One forum member shared a recipe that included a tablespoon of horseradish; that addition sounded intriguing to me, so I used it. The end result was wonderful. The rolls are soft and tasty. Perfect for sandwiches. And almost another full carton of cottage cheese used up.

Cottage Cheese Dill Bread
Adapted from Beth Hensperger's, The Bread Lover’s Bread Machine Cookbook
(Printable Recipe)

3 tbsp. olive oil
1 large shallot, chopped (I used ½ of a medium sized sweet onion)

1-1/3 cups NSA cottage cheese
1/3 cup fat-free milk
1 large egg plus 1 egg yolk
(I added 1 tbsp. prepared horseradish)
3-1/3 cups bread flour
2 tbsp. sugar
1 tbsp. plus 1 tsp. gluten
1-1/2 tbsp. dried dill weed (I used 1 tbsp. dill seed)
1-3/4 tsp. salt (I only used 3/4 tsp. salt)
2-1/4 tsp. SAF yeast or 1-3/4 tsp. bread machine yeast (I only used 1 tsp. bread machine yeast)

1. Heat the oil in a small skillet, and sauté the shallot until translucent. Set aside to cool to warm.

2. Place the ingredients in the pan according to the order in the manufacturer’s instructions, adding the shallot with the liquid ingredients (I added the horseradish with the liquids). Set crust on dark and program for Basic cycle; press Start. The dough ball will look very dry at first and take a few minutes to come together. Resist the urge to add more liquid.

3. When the baking cycle ends, immediately remove the bread from the pan and place it on a rack. Let cool to room temperature before slicing. (2-Pound Loaf)

Notes: I used the dough cycle and let the dough knead & rise in the bread machine. I divided it into 12 equal sized dough balls. I placed the dough balls on a jelly roll sheet lined with parchment paper and pressed to flatten each roll. I covered the rolls loosely with plastic wrap and let them rest for about 30 minutes.

I baked the rolls at 375 degrees for about 10 minutes on the middle oven rack, and then placed the pan directly on my oven stone for about another 7 minutes. I wanted to make sure the bottoms were cooked. After taking the baked rolls out of the oven, I immediately transferred them to cooling racks.

Finally, another forum member shared a recipe for a Chile-Cheese Egg Puff. It used green chilies and cottage cheese. My husband loves green chilies and I still needed to use up some cottage cheese, so I gave it a try. I made some changes, though. First I cut the recipe in half and used a lot less hard cheese than the recipe called for in order to cut sodium content. I used an extra sharp cheddar rather than the milder Jack cheese called for in the recipe. I find that when lowering salt content, it’s important to use products with some zing & flavor impact. I also used less butter. The end result was a wonderful omelet-like casserole. In fact, I’ve made it twice. It’s the type of dish that could be adapted to all kinds of additional vegetables or flavorings. And it used up more cottage cheese. Here’s the halved recipe:

Chile-Cheese Egg Puff
Becky from GardenWeb's Recipe Exchange
(Printable Recipe)


5 eggs
¼ cup flour
½ tsp. baking powder (I used Featherweight sodium free baking powder)
1 cup NSA cottage cheese
4-6 oz. shredded cheese
2 tbsp. melted unsalted butter
1 small (4 oz) can chopped green chilies (rinsed, drained, and pressed dry in paper towels)

Beat eggs until light and lemon-colored. Add flour, baking powder, cheese, and butter, blending smoothly. Stir in chilies. Pour into well-buttered 8 x 8 baking dish. Bake at 350 degrees for 35 minutes or until top is brown and center appears firm. (I ended up baking the casserole for about 40-45 minutes.) Serve hot.

And yet… In spite of all the above, one final (and lonely) partially used pint of cottage cheese still remains.

Sunday, November 30, 2008

Macaroni & Cheese

It's the epitome of comfort food. What's not to like? It's creamy, soft, & warm. It's got lots & lots of cheese and usually has wonderful crunchy, crispy edges to nibble on. Sometimes it even has a buttery crumb topping. And it's not hard to put together.

Making it low sodium? Well, that's a whole other matter. That's because as simple as basic macaroni & cheese is, it involves layers of salt. The macaroni is cooked in heavily salted water. The cream sauce is salted so it won't end up tasting like kindergarten paste. Cheese is naturally high in sodium. The sharper the cheese, the higher the sodium content. So if you want to jazz up your macaroni & cheese by adding some blue cheese, Gorgonzola, or asiago along with the usual cheddar, you'll end up with a super tasty dish that someone on a low sodium diet shouldn't be eating.

Recently my poor husband suffered the dreaded root canal. There were the weeks of tooth pain, diagnosing the problem, then getting an appointment with an endodontist, and finally recovering from the root canal. Lots of soft foods. That's when I decided to tackle lower sodium macaroni & cheese.

The recipe I followed was pretty basic and pretty typical. But I had to adjust the methods to make the over all dish low sodium and tasty. Believe me, the tasty part is the real challenge. Here's what I did:

Macaroni - For 8 oz. of elbow macaroni, most recipes call for at least 2 teaspoons of salt in 2 quarts of water. I omitted the salt completely. That left me with extremely bland tasting pasta, so I knew I had to make sure the cheese sauce was as flavorful as I could get it.

White Sauce - Here's one place where using butter is a must. Butter, even unsalted butter, has a unique flavor that complements cheese, pasta, and white sauce. Light flavored oils do not add much flavor, and olive oil can overpower the cheese.

To boost the sauce flavor, I sauteed one small, minced onion in the butter. I cooked it until it was quite soft and then added two minced garlic cloves too. It's important to cook the roux until it turns a deep tan color. This will eliminate any possibility of a pasty taste and will add a nice nuttiness to the sauce. I added about 1/2 teaspoon of dry mustard, a dash of cayenne pepper, and a teaspoon of low sodium Worcestershire sauce to the white sauce.

Add Ins - I mixed in a finely chopped passilla chile that I had roasted and frozen during the summer to add yet another layer of flavor without resorting to salt. Canned green chilies could be used instead (just be sure to use the brand with the lowest sodium content and drain well). Finely chopped fresh jalpenos would add some zing, as would some finely chopped sweet red pepper. A few chopped or thinly sliced sun dried tomatoes would add flavor & color (soften a bit in hot water or, if using jarred, be sure to use the brand with the lowest sodium content and drain well). And, of course, cooked & crumbled low sodium bacon would be great as long as you used no more than two slices (again, be sure to use the brand with the lowest sodium content).

Cheese - For 8 oz, pasta, most recipes call for at least 2 cups of grated cheese (about 8 oz.). Because of the missing salt in the macaroni & sauce, it's important to use a robust flavored cheese. I used about 1-3/4 cups of my favorite brand of extra sharp cheddar and about 1/4 cup of naturally low sodium but very flavorful Swiss cheese. (Feel free to adjust the ratio or cheddar to Swiss.)

Crumb Topping - I wanted to add a crumb topping because I thought it would add both flavor & texture. Here's another place where the wonderful flavor of butter is essential. I combined butter & homemade dried breadcrumbs together in a small saute pan. I also added a minced garlic clove and some chopped fresh herbs. I think any herbs, fresh or dried, would do, but I used some chives, thyme, & oregano from my pots of herbs outside. I cooked everything together until the butter & breadcrumbs gave off a nice, toasty aroma. Then I added about 2 teaspoons of grated Parmesan cheese. This added an extra touch of cheesiness to the topping.

The verdict? I successfully managed to make a flavorful macaroni & cheese dish without overloading on the sodium. I was pleased with the result and so was my husband.

Macaroni and Cheese
(Printable Recipe)

Crumb Topping:
1 cup dry bread crumbs
3 tbsp. unsalted butter
1 -2 tablespoons finely minced herbs, dried or fresh
2 teaspoons finely shredded Parmesan cheese (optional)

Cheese Sauce:

1 small onion, minced
2 garlic cloves, minced
3 tbsp. unsalted butter
3 tbsp. flour
2 - 2 1/2 cups milk
1/2 tsp. dry ground mustard
Dash cayenne pepper (optional)
1 tsp. lo sodium Worcestershire sauce
1 1/2-3/4 c. extra sharp cheddar cheese, grated
1/4 c. Swiss cheese

Add-Ins: (optional)
Chopped jalapeno pepper
Rinsed & drained 4 oz. can green chili
Chopped sweet red bell pepper
Minced canned red pepper (pimento)
2 slices cooked & crumbled low sodium bacon

8 oz. elbow macaroni

Preheat oven to 350 degrees. Grease an 8 inch square casserole dish. (Do not use a casserole dish that's too deep. It's important that every serving and almost every bite includes a well distributed amount of the flavorful crumb topping.)

Combine crumb topping ingredients except Parmesan cheese in small pan and saute together until toasty. Take off heat & add Parmesan cheese. Set aside.

Bring at least 2 quarts of water to boil. Add macaroni and cook until pasta is fully tender, NOT al dente. Drain and set aside.

Melt the 3 tbsp. butter in a saucepan over medium heat. Stir in the minced onion and cook until the onion softens and turns translucent. Add minced garlic and cook another minute.

Stir or whisk in the flour, mustard, Worcestershire, and cayenne (if using). Combine well and let cook until mixture deepens in color, 2 - 3 minutes. Gradually whisk in milk. Continue stirring or whisking until mixture comes to a bubbling simmer. Lower heat and simmer until mixture thickens, about 5- 10 minutes. Include add-ins, if using.

Take the mixture off heat and stir in the cheeses until melted. If sauce seems too thick, add additional milk or some NSA broth, one tablespoon at a time. Combine sauce with pasta and pour into prepared baking dish. Sprinkle casserole evenly with crumbs.

Bake until top is golden brown and bubbly, about 15-20 minutes. Do not over bake; you're just heating everything up. Let cool or set about 5 minutes before serving.

Sunday, November 2, 2008

Tamale Pie that Tastes like Real Tamales

I love tamales! I've loved them since I first tasted them as a kid. My uncle's first hamburger stand in LA, Tommy's, had a limited menu of chili burgers & cheeseburgers, chili dogs, and tamales -- everything smothered in his special chili sauce. Whenever we'd visit him there, we'd always get a chili cheeseburger and I'd often get an additional tamale for "dessert." My mom would grab a few gigantic onions and humongous beefsteak tomatoes to take home. Me? I'd take home a couple of Xlnt tamales.
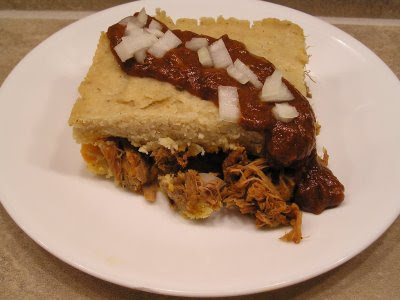
Since then I've regularly ordered tamales at Mexican restaurants, picked them up from small stands, and bought them either in the deli or frozen foods section of local grocery stores. However, I've never tried making them myself. I've always assumed it would be too difficult for me to tackle and too much work to motivate me.

I also like traditional tamale pie. It's a very tasty casserole -- a chili flavored hamburger mixture that often includes corn, olives, & sometimes beans nestled underneath a cheesy cornbread topping. Good stuff & very flavorful. Just not true tamale flavor. The most striking difference is that tamales use Masa Harina while tamale pie casserole uses ordinary cornmeal. Masa Harina is specially made from a large kernel corn that is dried and processed with lime; it is used in making tamales and corn tortillas. Also, traditional tamale pie is baked; true tamales are steamed.

I always wondered if there was a way to use true tamale ingredients but to cook them casserole style like tamale pie. I decided to give it a try.

The first thing I did was cook a 3-4 pound pork shoulder roast. I cut it in two gigantic pieces, removed excess fat, and stuck the pieces in my slow cooker. I added a 19 oz. can of Las Palmas red enchilada sauce, a couple of cloves of garlic, a small, finely minced onion, and a teaspoon of cumin. I did not add any additional liquid because slow cookers have a tendancy to make foods too watery. I let everything cook until the pork was falling-apart tender. Then I removed the pork, let it cool a bit, and chunked it up while removing any additional fat I discovered. I used my kitchen scissors to cut longish chunks so that there would be no long strings of meat in the final mixture. I refrigerated the broth & meat separately overnight. The next day I scraped off all the solidified fat from the broth and combined it with the meat, once again, in the slow cooker. I added about two cups of low sodium chicken broth, about a tablespoon of salt-free chili powder, and a 1/2 teaspoon of cumin powder to the mixture. I also added about 3 tablespoons of Wondra flour that had been mixed with about 1/4 cup of water. I cooked the meat mixture in the slow cooker on high for another hour, stirring to shred the meat further, until the mixture was quite thick.

Then I started working on the tamale dough. The masa package recipe called for 2/3 cup lard or vegetable shortening. I didn't want to use either of those ingredients. I don't have any problems with lard. After all, lard, along with butter & olive oil has been used by human beings for thousands of years. I don't care much for vegetable shortening, however, because it's one of those "new-fangled" fats. But my real problem with both those choices is that they needed to be beaten until fluffy. Hey! I'm way too lazy to beat lard or shortening! The whole point of making tamales in a casserole is to cut down work. So I took a cue from Ginger of the Recipe Exchange. Her tamale dough recipe used oil rather than the solid fats.

Once I mixed up the tamale dough, I pressed half of it into a lightly oiled glass casserole dish. I pressed the mixture as evenly as I could on the bottom and up the sides. I spooned in a generous amount of the pork mixture evenly over the dough. I used a slotted spoon so that the filling wasn't too juicy. Then I placed the remaining tamale dough over the filling, trying to make the top portion the same thickness as the bottom. I found the top difficult to spread, so I ended up patting out "blobs"of dough in my hands to get the right thickness before putting them on top.

I did not want to just stick the casserole in the oven & bake it. I knew it would crisp up and not have the nice steamed texture of true tamales. So I baked the casserole in a water bath. I put a large roasting pan in the oven. Then I put the uncovered tamale casserole in the pan and poured about 2 inches of very hot water in. I covered both the casserole & roaster with one layer of heavy duty aluminum foil. I baked it a little over 45 minutes, until the masa was set. I took off the foil, lifted out the casserole, and let it cool slightly before serving with some chili gravy. The verdict? Yes, I had duplicated true tamale flavor without all the work. I was happy!

Since I had quite a bit of pork left over, a few days later I made tamale pie again. This time I made half the dough recipe and only covered the bottom of the casserole. I wanted to see if I could make the dish a little lighter but still keep the true tamale flavor. It worked out fine too.

Tamale Pie with Masa Crust
(Printable Recipe)

Tamale Dough:

2 cups Masa Harina
2 cups lukewarm NSA broth
1 teaspoon baking powder (I used Featherweight no sodium baking powder)
1/4 teaspoon salt (optional)
1/2 cup light flavored oil (I think you could use only 1/3 cup and still get good results)

Combine masa, broth, baking powder, salt, and oil in a large bowl, Mix together until dough has the consistency of soft paste (I used my Danish dough whisk). Cover & let rest for at least 15 minutes at room temperature so the dough can thoroughly absorb the moist ingredients.

Pork Filling:

1-1/2 lbs. boneless pork shoulder (you may substitute chicken, turkey, or beef)
10 oz. can red chili or enchilada sauce (green chili enchilada sauce would also work well with pork, chicken, or turkey)
1 small onion, finely chopped
1-3 cloves minced garlic
1/2 tsp. ground cumin
2-4 cups water or NSA broth
1 teaspoon salt-free chili powder
1/4 teaspoon ground cumin
2 tablespoons Wondra flour mixed with 1/4 cup water
1 cup water or NSA broth if needed

Remove excess fat from meat. Place meat, canned sauce, onion, garlic, and cumin in dutch oven or slow cooker. (If using slow cooker, use only about 1 - 2 cups water or broth.) Cook over low simmer until meat is quite tender and shreds easily. Remove meat and let cool a bit. Cut meat into large chunks, and discard any fat pockets; refrigerate overnight.

Refrigerate broth overnight too. The next day, remove solidified fat from broth. Combine meat, leftover cooking broth, spices, Wondra flour slurry, and additional broth (if needed). Simmer the mixture, stirring often, until it is quite thick.

Tamale Pie Assembly:

Preheat oven to 350 degrees. Grease an 8 x 8 or 9 x 9 square ovenproof baking casserole dish.

Press half of the tamale dough into the casserole dish. Press the mixture evenly on the bottom and up the sides, about 1/4 inch thick, no thicker. Spoon a generous amount of the pork mixture evenly over the dough, being careful not to spoon in too much gravy. (a slotted spoon is helpful here). Spread the remaining tamale dough over the filling, trying to make the top portion the same thickness as the bottom. (As mentioned above, I ended up patting out "blobs"of dough in my hands to get the right thickness.)

Place the tamale casserole into a large roasting pan. Place the two pans on an oven rack. Pour very hot water into the outer pan, filling with about 2 inches of very hot water. Seal the the large pan with foil.

Bake for 45 minutes to an hour or until the masa is set. Take off the foil and remove the tamale casserole from the roasting pan. Let it cool slightly before serving. Remove the water filled large roasting pan after the oven has cooled off.

Serve warm with chili gravy, sour cream, shredded cheese, chopped onions, salsa, or whatever your heart desires. Leftover pork mixture may be used in tacos, enchiladas, burritos, and tostadas, or frozen for later use.

Chili Gravy
(Printable Recipe)

1/4 cup oil
1/4 cup flour
1 teaspoon powdered garlic
2 teaspoons ground cumin
1/2 teaspoon dried oregano (Mexican oregano, if available)
2 tablespoons unsalted chili powder
2 cups water or NSA broth

Heat the oil in a skillet over medium-high heat. Stir in the flour and continue stirring for 3 to 4 minutes, or until it makes a light brown roux.

Add all the dry ingredients and continue to cook for 1 minute, constantly stirring and blending ingredients. Add NSA broth or water, mixing and stirring until the sauce thickens. Turn heat to low and let sauce simmer for 10 minutes. Add water to adjust the thickness. Makes about 2 cups.

Monday, August 4, 2008

A Summer Moussaka

I love eggplant! I ate it frequently while growing up in my Greek household. My mom often made simple, fried eggplant slices as a side dish vegetable. It's still my favorite way to eat it. And then there were those special dinners of fried eggplant, cooked whole beets, fried fish, and Skorthalia, a fresh garlic sauce. My dad & grandma used to love those meals. We'd often have Melintzanoslata, a delicious eggplant spread similar to Baba Ganoush. Of course, no self respecting Greek could ignore Moussaka. It's a sumptuous casserole of eggplant slices layered in a cinnamon perfumed tomato sauce and topped with a Parmesan flavored egg custard.

Saturday at the farmer's market I picked up three perfectly fresh eggplants, two purple beauties and one striped zebra. Yesterday I decided to fry them up. First I sliced them about 1/3 - 1/2 inch thick. I don't like thin eggplant slices because I think that by the time they're coated with either breading or sauce, the eggplant flavor is lost. I dredged the slices in flour seasoned with some garlic powder & crushed dried Greek oregano. I fried them in oil until they were nicely browned on both sides. A perfect accompaniment to our lunch of fresh tomato & sweet onion sandwiches.

There were several slices left over, so I started thinking about Moussaka. Hmmm! I had a blob of ground beef in the refrigerator that I needed to use up. I've already got fried eggplant slices. Could I possibly come up with something that didn't require a 9 x 12" casserole dish and a full hour of baking in the oven? After all, it's summer. It's hot. And I had already spent the morning baking my weekly batches of Oatmeal Scones and Bran Muffins. I wondered... Could I make Moussaka stacks, plopping everything on the individual eggplant slices? I decided to give it a try and pulled out my Moussaka recipe.

The first thing I did was make the tomato sauce. I had just about 1/3 pound of ground beef so I halved all the other sauce ingredients. I omitted salt, used a low sodium tomato paste & leftover Trader Joe's low sodium chicken broth, and added 1 teaspoon of red wine vinegar for added punch. I cooked the meat sauce down until there was almost no liquid left.

Then I made the bechamel sauce. I halved its ingredients too. Since I was planning on topping individual slices of eggplant, I figured the custard mixture needed to be thicker than what I usually poured over the casserole top. Instead of adding whole eggs to the cream sauce, I just added two egg yolks. I also omitted salt and used about two tablespoons of grated Parmesan cheese.

Finally, I put everything together. I used four eggplant slices. I covered each slice with the meat sauce and then the cream sauce custard mixture. Popped the slices into my toaster oven for about 15 minutes at 350 degrees. Then I broiled them for a couple of minutes to brown the tops. Perfect! They tasted great AND the house was still cool.

I had a bit of the cream sauce mixture left over and,of course, the two egg whites. I'm planning on using them today in an omelet lunch. All in all, I think the experiment was a success. A casserole full of Moussaka is an impressive dish for guests but a little too much for just a simple evening meal for two. This method worked out really well, and I know I'll be making it more often. Especially now that eggplants are showing up in the farmer's markets.

Moussaka: Greek Eggplant Casserole

A classic Greek dish, famous throughout the world, and a favorite at Greek restaurants and festivals. Delicious eggplant layered with a spicy tomato sauce and topped off with a Parmesan flavored egg custard. A feast for the eyes and the palate!

Meat Sauce:
1 pound lean ground beef or lamb
2 large onions, finely chopped
2 – 4 cloves garlic, finely chopped
2 tablespoons olive oil
1 6-ounce can.tomato paste
¾-1 cup water or NSA broth (may substitute up to ½ cup wine for water or broth)
teaspoon allspice
¼ teaspoon nutmeg
½ teaspoon cinnamon
1 teaspoon Greek oregano
Salt & pepper to taste

Eggplant:
3 large eggplants
Vegetable oil
Flour (optional)
Egg (optional)

Cream Sauce:
½ cup flour
½ cup butter
2 cups warmed milk
4 eggs, beaten
¼ cup Parmesan cheese
Dash nutmeg

Meat Sauce Preparation:
Sauté onion and garlic in olive oil until translucent; do not brown. In separate pan, brown ground beef or lamb; drain well. Add browned ground meat, tomato paste, water, broth, or wine, nutmeg, allspice cinnamon, and oregano to onion mixture.

Simmer about 20 minutes over medium heat; sauce will not be juicy. 

Cream Sauce Preparation:
Melt butter and stir in flour. Cook over medium/low heat, stirring until mixture is well blended and bubbling. Off heat, add warmed milk slowly and stir continuously until sauce is well blended and thickened. Sauce will be quite thick. Allow sauce to cool. Add beaten eggs to sauce; stir until all sauce is blended with eggs. Stir in ¼ cup Parmesan cheese and dash nutmeg.
Eggplant Preparation:
If desired, peel eggplant. Slice into 1/3 - 1/2 inch rounds. Choose a browning method for eggplant:
Baked – Brush eggplant slices with oil and bake in 425° oven, turning once, until both sides are golden brown (about 10 minutes per side); do not overcook.
Broiled – Brush eggplant slices with oil and broil, turning once, until both sides are golden brown (about 5-7 minutes per side); do not overcook.
Fried – Coat the eggplant pieces generously with flour (if desired, dip slices in egg wash and flour a second time); heat oil in a skillet and fry eggplant, turning once, until golden brown; do not overcook; drain well on paper towels.
Moussaka Assembly:
Brush bottom and sides of deep 13 x 9 inch baking dish with olive oil. Place ½ of eggplant slices onto bottom of pan; cut slices to fit so that the entire surface is completely covered with eggplant. Spoon meat mixture over eggplant. Top with remaining eggplant slices; cut slices to fit so that the entire surface is completely covered with eggplant. Pour cream sauce over all; spread evenly to completely cover all the eggplant.
Bake at 350° for 60 minutes (the top should be set, slightly puffy, and nicely browned). Let rest for 15 minutes before cutting into serving pieces.
Variations:
Potato:
For easier serving and a firmer texture, potatoes may be substituted for part or for all of the eggplant. Peel and cut potatoes lengthwise into ⅓-½ inch thick slices; sauté  slices lightly in olive oil. Potato slices may also be brushed lightly with olive oil and baked. If using a combination of eggplant and potatoes, place potato layer on bottom of casserole.
Summer Squash:
Summer squash (zucchini, crookneck, pattypan, etc.)  may be substituted for part or for all of the eggplant. Cut squash lengthwise into ⅓-½ inch thick slices and either bake, broil, or fry as the eggplant before assembling the casserole. Do not overcook squash, and do not use overgrown squash with large seeds.