
 |
| Extra Crispy Fried Chicken |
Not long ago my local PBS station started showing Cook’s Country, another cooking program from the producers of America’s Test Kitchen. I happened to catch an episode devoted to fried chicken. I watched, hoping to pick up some helpful tips. The technique used was pretty close to what I was already doing but with a few tweaks.
A Soapbox Rant: I really have a problem with the present obsession with either salting or brining meat. I get tired of almost every pork or poultry recipe in just about every cooking magazine or cooking show starting with salting/brining as the first step. And always accompanied by some sort of phraseology implying that the only way to ensure juicy, tender meat is to salt or brine it. The producers of Cook’s Country and Cook’s Illustrated magazines and the America’s Test Kitchen TV show are in that camp. So, of course, their fried chicken recipe begins with a buttermilk/salt brine. Naturally, I stuck with my tried and true plain buttermilk soak.
However, the recipe also included an interesting twist. The recipe testers discovered that the addition of a dribble of buttermilk mixed with the flour produced a crispy coating with delicious crunchy bits. I gave the technique a try and was quite pleased with the results. Since then, I’ve made the fried chicken two additional times, using various bone-in cuts. The recipe produces a really crispy and crunchy fried chicken. And juicy too! Even without brining in a salt solution. (By the way, the real key to tender, juicy meat is to not overcook it. Pretty simple! A good instant probe thermometer is a valuable tool.) Here’s my adaptation of the Cook’s Country recipe:
Extra-Crunchy Fried Chicken
(Printable Recipe)
2 cups buttermilk plus 6 additional tablespoons (I use Knudsen brand, a very low sodium product)
1 whole chicken, about 3 1/2 pounds, cut into 8 pieces (I usually fry bone-in thighs or sometimes boneless, skinless breasts)
3 cups all-purpose flour
2 teaspoons no sodium baking powder (I use Hain Featherweight)
3/4 teaspoon dried thyme
1/2 teaspoon ground black pepper
1/4 teaspoon garlic powder
Vegetable oil (I use only about ¼ - ⅓ inch of oil)
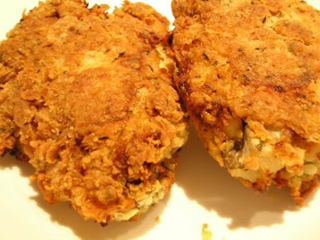 |
| Crispy, Crunchy, and Delicious! |
1. Combine 2 cups buttermilk and chicken pieces in large bowl and stir to coat; cover bowl with plastic and refrigerate for 1 hour. (I use enough buttermilk to completely cover the chicken pieces and season it with a dash of Tabasco. I let the chicken soak for at least two hours.)
2. Whisk flour, baking powder, thyme, pepper, and garlic powder together in large bowl. Add remaining 4 - 6 tablespoons buttermilk; with your fingers rub flour and buttermilk together until buttermilk is evenly incorporated into flour and mixture resembles coarse wet sand.
3. Working in batches, drop chicken pieces into flour mixture and turn to thoroughly coat, gently pressing flour mixture onto chicken. Shake excess flour from each piece of chicken and transfer to wire rack set over rimmed baking sheet.
4. Heat oil in large heavy-bottomed Dutch oven or skillet with 11-inch diameter over medium-high heat until it reaches 375 degrees. [I use a straight-sided frying pan and pour in only about ¼ - ⅓ inch of oil. I don’t use a thermometer.] Place chicken pieces, skin-side down, in oil, cover, and fry until deep golden brown, 8 to 10 minutes. Remove lid after 4 minutes and lift chicken pieces to check for even browning; rearrange if some pieces are browning faster than others. Adjust burner, if necessary, to regulate temperature of oil. Turn chicken pieces over and continue to fry, uncovered, until chicken pieces are deep golden brown on second side, 6 to 8 minutes longer. At this point, to keep chicken from browning too quickly, you may want to turn the heat down a bit. Using tongs, transfer chicken to plate lined with paper towels; let stand for 5 minutes to drain. Serve.
Update: I've found that I get almost the same result by putting all my flour in a plastic bag and dropping the buttermilk soaked chicken pieces in individually. A couple a shakes and then a quick massage in the bag keeps my hands cleaner yet still gets the bits of flour/buttermilk clumps on the chicken pieces.
8 comments:
I agree about the "brining" .. I have never used that method and see no sensible reason to do so, your chicken is perfect!
I'm annoyed at constant brining as well, but I made their very similar Cook's Illustrated (not Cook's Country) fried chicken recipe last week, and I DID choose to brine the chicken -- but I used salt substitute, not salt, because I'm on a low sodium diet.
I have made these recipes before without brining, for the obvious reasons, but fried chicken is a bit of a production for me so I decided to spend the $2 on the salt substitute necessary for it (knowing most of it would go down the drain) just to see.
And, annoying as all hell, it really made a difference.
Brining (this is technically "brinerating" in their terms, combining a brine with marinating in other flavors) does more than get salt (or salt substitute) into the meat. The charges on the ions in sodium chloride (or potassium chloride) change the nature of some of the proteins in the meat, making them hold on to moisture at higher temperatures. It doesn't just season, it keeps the meat juicier.
I know this because I had trouble controlling my oil temperature at times, and I definitely overcooked a couple of pieces of the chicken, but they were still juicy inside. Without the brine, from past experience, I know they would have been dry as a bone.
Now, my circumstances are not necessarily universal: I'm on a low-sodium diet for heart failure, and I'm also on daily diuretics that remove both sodium and potassium from my system. I'd have to take potassium supplements to make up for this if I weren't using a decent amount of salt substitute in my diet (and was originally prescribed potassium, but blood tests showed I could stop taking it).
Cook's Illustrated tested sodium absorption in brined meats, documented here. The measurements are confusing, but 100 grams of cooked meat is 3.5 ounces, or slightly more than the standard USDA "serving" of cooked meat (4 ounces uncooked, 3 ounces cooked). They found:
"The brined pork chops had a sodium content of 245 milligrams per 100 grams of meat (just under 1/8 teaspoon per serving); the enhanced pork had a bit more, with 268 milligrams. The kosher chicken breast weighed in at 252 milligrams of sodium. The brined chicken came in with the most sodium of all, at 353 milligrams (just over 1/8 teaspoon per serving). The USDA recommends limiting your daily sodium intake to 2,300 milligrams, about 1 teaspoon."
The brine they use for fried chicken calls for 1/2 cup plus 2 tablespoons of table salt (they don't use 1/8 cup measurements, even though that's the same as "5/8 cup", so that's about 6 1/4 ounces of table salt. Table salt is 40% sodium, so that's 2.5 ounces of sodium in the brine (not counting the buttermilk), or 70.9g of sodium. Of that 70,900 mg of sodium for a standard 6 oz chicken breast brine, only about 605mg of it got into the meat.
Now, mind you, I'm not saying 605mg of sodium is small—it's more than I'd want! I'm saying that this huge amount of salt added to the 2 quarts of buttermilk (or water) for brining almost entirely goes down the drain. The same is true with salt substitute, but it gets a little bit more potassium into the meat. (KCl is 50% chlorine by weight; NaCl is 60% chlorine by weight), so it seems safe to guess that a 3.5 ounce portion of cooked chicken absorbs about 425mg of potassium.
(Overlong -- continued in next comment)
(continued from previous comment)
For something like fried chicken, you have to use that much "salt" (of sodium or potassium) to get it into the meat because you're also soaking it in buttermilk. For chicken you're not soaking in a liquid for other reasons, that you would just plain "brine," you can get the same effect by "salting" the meat: evenly cover the meat with about 1 1/4 teaspoons of table salt (or, for me, salt substitute) and let it rest in the fridge, uncovered, for six hours. The "salt" (of either kind) first draws out the moisture in the meat, but then as it gets balanced, it goes back in and takes the "salt" with it, doing the same thing as a brine but with no liquid. For skin-on chicken pieces, you have to get the salt in under the skin for it to work, though. And it does take six hours.
And it adds about 425mg of potassium (or 350mg of sodium, if you use salt) for each cooked 3.5 ounce portion. But it does make a difference in how juicy the meat stays, particularly if you slightly overcook the white meat for some reason. They're always advocating the brine because it makes the recipes more foolproof: if your roast chicken or turkey goes up to 165°F or 170°F without brining, it's going to be dry and chewy. With brining (or adequate "salting"), it remains juicy.
I don't know about you, but I overcook chicken about once out of every 5 times I cook it, so this is a handy technique to have in the toolbox if you know what it does and whether or not you can take (or want) the sodium or potassium. For me, salt substitutes are self-limiting: too much salt in food makes it taste "salty," but too much salt substitute makes it taste metallic and bitter. This brinerated chicken didn't come anywhere close to that threshhold; it was just delicious. But your sodium and potassium requirements are right for you; these are what work for me.
For most cases, I'm neither going to brine nor salt in advance (with salt substitute). Brining takes half of a container of my preferred salt substitute and that's nearly $3 worth of salt substitute that just gets poured down the drain before I even cook the meat. Salting is more economical, but requires thinking about it 6 hours in advance, and that rarely works out for me.
But since I went through this just four days ago, and have first-hand results of the test of doing it with brining vs. normally without, I can tell you it does make a noticeable and tasty difference. Not enough to spend $3 or six hours every time I cook chicken, but enough to do it on special occasions.
Matt, thanks for your comments and research. Your thoughts on brining are really interesting. I can see that using a salt substitute would get rather expensive, just to throw out the brine.
I'm sure that brining/salting does have a positive effect on meat. But I guess I just don't get that upset if my chicken or pork is slightly overcooked. I'd rather use my salt allocation in something other than brining.
I can certainly understand not wanting to (or being able to) use salt substitute for brining or even "salting." Those aren't scare quotes—I'm just using "salt" in the chemical sense of "ionic compounds composed of cations (positively charged ions) and anions (negative ions) so that the product is electrically neutral (without a net charge)." Thanks Wikipedia! :-) All salt in cooking is normally sodium chloride, but potassium chloride is a "salt" also, and so terms like "salting" are correct for using KCl even though in this context it gets really misleading. So I use the quotes.
The same Cook's Illustrated research shows that soaking meat in plain water also leaves it juicier after cooking, but brining leaves the cooked meat twice as juicy because of the chemical interaction between "salt" and the proteins in the meat. Technically, the poultry soaked in water retained something like 9% more weight after cooking than unsoaked, but brined poultry retained 18% more weight from not losing water ("juice") during cooking. So brining is twice as effective as soaking, but soaking still does good.
And for fried chicken, you're already soaking in buttermilk, which has some sodium in it (about 257mg per cup of low-fat buttermilk, according to Wolfram Alpha), but by the proportions mentioned above, that only translates to 2mg of sodium into the meat per cooked 3.5oz portion of fried chicken. To be safe, add another 100mg or so for the buttermilk that stays on the outside of the skin after soaking (easily less than 1/2 cup for the entire chicken).
If you really want to get geeky (and we're on the Internet, so why not?), you can use that ratio to calculate how much you're willing to brine. If the standard brine is 10 tablespoons of salt and it adds 353mg of sodium to each 3.5oz portion of cooked chicken, it stands to reason that 1 tablespoon would add no more than 35mg of sodium to the same portion. 2 tablespoons in the brine (1/8 cup) would add 71mg, 3 tablespoons would add 105mg, and so forth, up to 10 tablespoons adding 353mg of sodium to boneless skinless chicken breasts.
It's extremely probable that bone-in parts would absorb less because of the bones and skin. It's also likely that reducing the salt will have a correspondingly weaker effect on keeping the finished chicken juicier. But it's an option if anyone has restrictions and really needs help with dry chicken.
I really love fried chicken. These are great tips. I will keep these tips for weekend.
I just thought I would share that I have had good luck find low salt foods at www.LowSaltGrocery.com .
I soaked my chicken pieces (being careful to buy fresh chicken without infused or injected sodium) in lots of fresh lemon juice and fresh ground pepper (in frig for an hour or two). Floured with some garlic powder and lots of cayenne and some paprika. Fried in olive oil using thermometer to return the oil to 350 before adding batch. Delicious.
Post a Comment