
 |
| Extra Crispy Fried Chicken |
Not long ago my local PBS station started showing Cook’s Country, another cooking program from the producers of America’s Test Kitchen. I happened to catch an episode devoted to fried chicken. I watched, hoping to pick up some helpful tips. The technique used was pretty close to what I was already doing but with a few tweaks.
A Soapbox Rant: I really have a problem with the present obsession with either salting or brining meat. I get tired of almost every pork or poultry recipe in just about every cooking magazine or cooking show starting with salting/brining as the first step. And always accompanied by some sort of phraseology implying that the only way to ensure juicy, tender meat is to salt or brine it. The producers of Cook’s Country and Cook’s Illustrated magazines and the America’s Test Kitchen TV show are in that camp. So, of course, their fried chicken recipe begins with a buttermilk/salt brine. Naturally, I stuck with my tried and true plain buttermilk soak.
However, the recipe also included an interesting twist. The recipe testers discovered that the addition of a dribble of buttermilk mixed with the flour produced a crispy coating with delicious crunchy bits. I gave the technique a try and was quite pleased with the results. Since then, I’ve made the fried chicken two additional times, using various bone-in cuts. The recipe produces a really crispy and crunchy fried chicken. And juicy too! Even without brining in a salt solution. (By the way, the real key to tender, juicy meat is to not overcook it. Pretty simple! A good instant probe thermometer is a valuable tool.) Here’s my adaptation of the Cook’s Country recipe:
Extra-Crunchy Fried Chicken
(Printable Recipe)
2 cups buttermilk plus 6 additional tablespoons (I use Knudsen brand, a very low sodium product)
1 whole chicken, about 3 1/2 pounds, cut into 8 pieces (I usually fry bone-in thighs or sometimes boneless, skinless breasts)
3 cups all-purpose flour
2 teaspoons no sodium baking powder (I use Hain Featherweight)
3/4 teaspoon dried thyme
1/2 teaspoon ground black pepper
1/4 teaspoon garlic powder
Vegetable oil (I use only about ¼ - ⅓ inch of oil)
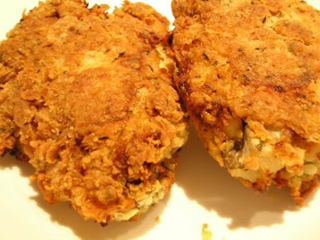 |
| Crispy, Crunchy, and Delicious! |
1. Combine 2 cups buttermilk and chicken pieces in large bowl and stir to coat; cover bowl with plastic and refrigerate for 1 hour. (I use enough buttermilk to completely cover the chicken pieces and season it with a dash of Tabasco. I let the chicken soak for at least two hours.)
2. Whisk flour, baking powder, thyme, pepper, and garlic powder together in large bowl. Add remaining 4 - 6 tablespoons buttermilk; with your fingers rub flour and buttermilk together until buttermilk is evenly incorporated into flour and mixture resembles coarse wet sand.
3. Working in batches, drop chicken pieces into flour mixture and turn to thoroughly coat, gently pressing flour mixture onto chicken. Shake excess flour from each piece of chicken and transfer to wire rack set over rimmed baking sheet.
4. Heat oil in large heavy-bottomed Dutch oven or skillet with 11-inch diameter over medium-high heat until it reaches 375 degrees. [I use a straight-sided frying pan and pour in only about ¼ - ⅓ inch of oil. I don’t use a thermometer.] Place chicken pieces, skin-side down, in oil, cover, and fry until deep golden brown, 8 to 10 minutes. Remove lid after 4 minutes and lift chicken pieces to check for even browning; rearrange if some pieces are browning faster than others. Adjust burner, if necessary, to regulate temperature of oil. Turn chicken pieces over and continue to fry, uncovered, until chicken pieces are deep golden brown on second side, 6 to 8 minutes longer. At this point, to keep chicken from browning too quickly, you may want to turn the heat down a bit. Using tongs, transfer chicken to plate lined with paper towels; let stand for 5 minutes to drain. Serve.
Update: I've found that I get almost the same result by putting all my flour in a plastic bag and dropping the buttermilk soaked chicken pieces in individually. A couple a shakes and then a quick massage in the bag keeps my hands cleaner yet still gets the bits of flour/buttermilk clumps on the chicken pieces.